Everybody likes beauty, so they go to the beauty parlor. polygel nails is one of the beautification material. For removing polygel nails at home, you can use spirit. You will find polygel nail removing materials into the best polygel nail kit box.
You look down at your hands. Two or three weeks ago, your fresh set of polygel nails looked flawless—a perfect, high-gloss masterwork of modern nail technology combining the indestructible strength of acrylics with the lightweight flexibility of hard gels. But now, the lifecycle of your manicure has reached its inevitable tipping point. You are noticing significant growth gaps at your cuticles; a couple of edges have started lifting, snagging frustratingly on your hair and clothes; and perhaps one nail has suffered a structural fracture from daily wear.
The temptation right now is immediate, intense, and incredibly dangerous: you want to slide a thumbnail underneath that lifted edge and peel, pop, or rip the remaining polygel structure completely off your natural nail.
Stop. Take a breath, step away from the edge of your vanity, and drop your hands.
Peeling or forcing a lifted polygel extension off your nail bed does far more than just remove the product. Because polygel forms an incredibly tight, cross-linked chemical bond with the keratin layers of your natural anatomy, ripping it off tears away the top 10 to 15 protective layers of your natural nail plate. This leaves you with thin, splitting, painfully raw, and red nail beds that can take over four to six months to fully grow out.
Which materials can remove polygel nail?
You can remove it with a different method. Most of the user remove it manually that will harmful for health. Even you can remove it with a drill.
How long do Polygel nails last?
Most of the nail extension company claim it lasts up to 2 weeks to 4 weeks. But after check some customer reviews, we can say it can last easily for 3 weeks.
Does Polygel ruin your nails?
As per customers feedback, it is applied and removed properly. It feels too much lighter to wear. You can check some reviews about nail extension.
You do not need to make an emergency trip to a high-end salon or spend a fortune to get this product off your hands. Removing polygel nails at home can be done with absolute professional precision, total safety, and zero structural damage to your natural nails. All it takes is the right technical knowledge, a few basic tools, and a little bit of patience.
+-------------------------------------------------------------+
|               THE ANATOMY OF POLYGEL DESTRUCTION            |
+-------------------------------------------------------------+
|  [Ripping / Peeling Product]                                |
|          │                                                  |
|          ▼                                                  |
|  [Tears Top 15 Keratin Layers] --> Leaving nails raw & thin  |
|          │                                                  |
|          ▼                                                  |
|  [Exposes The Delicate Nail Bed] --> Creates infection risk |
|          │                                                  |
|          ▼                                                  |
|  [Requires 6 Months Growth Cycle] --> Long, painful recovery|
+-------------------------------------------------------------+
When you use a systematic removal process—whether you choose a professional acetone soak-off sequence, a controlled manual filing breakdown, or a modern electronic file (E-file) thinning method—you are participating in a safe, controlled chemical and mechanical degradation process. You are gently breaking down the synthetic polymer networks while keeping the underlying natural nail tissue completely intact.
For beauty enthusiasts, self-care advocates, and busy professionals navigating life across major, fast-paced metropolitan hubs in the United States—from the high-visibility corporate and fashion worlds of New York City and Los Angeles, the tech-driven, minimalist lifestyles of San Francisco and Silicon Valley, to the vibrant, high-humidity climates of Miami, Houston, and Washington, D.C.—mastering the art of safe DIY cosmetic maintenance is an empowering, cash-saving skill. It allows you to maintain a pristine, high-end appearance right from the comfort of your home without disrupting your busy weekly calendar.
This comprehensive, highly detailed master maintenance guide for itemguides.com delivers an exhaustive exploration of how to remove polygel nails at home. We will break down the chemistry of polygel formulas, provide clear step-by-step removal methods, detail essential nail health restoration protocols, highlight critical safety mistakes to avoid, and arm you with a professional maintenance blueprint to keep your natural hands exceptionally strong, healthy, and beautiful.
1. The Chemistry of Polygel: Why Removal Demands Precision
To remove polygel safely from your hands, you first need to understand the chemical composition of the product and how it behaves when exposed to manual tools and solvents. Polygel is a breakthrough hybrid formula designed to eliminate the common pain points of older nail enhancement systems.
+-------------------------------------------------------------+
|                   THE HYBRID POLYGEL MATRIX                 |
+-------------------------------------------------------------+
|  [ACRYLIC POWDER]      +      [PHOTO-INITIATOR GEL]         |
|  (Delivers absolute           (Provides working flexibility  |
|   structural strength)         and zero airborne odor)      |
|          │                             │                    |
|          +──────────────┬──────────────+                    |
|                         │                                   |
|                         ▼                                   |
|             [THE CURED HYBRID POLYMER]                      |
|             - Creates a highly stable, tight chemical web.  |
|             - Resistant to simple washing or popping.       |
|             - Demands strategic chemical or manual breakdown.|
+-------------------------------------------------------------+
The Hybrid Polymer Design
Older enhancement systems generally fall into two distinct chemical categories:
- Traditional Acrylics: A two-part system combining a liquid monomer with a polymer powder. It cures via an exothermic chemical reaction triggered by air exposure, creating a rock-hard, dense structure that is highly soluble in acetone.
- Hard/Builder Gels: An oligomer-based formula that remains completely fluid until exposed to ultraviolet (UV) or light-emitting diode (LED) light wavelengths. This light exposure triggers a rapid cross-linking chemical reaction, creating an incredibly tough, flexible network that is entirely insoluble in acetone and must be completely filed away.
Polygel combines the absolute best attributes of both worlds into a single pre-mixed paste. It blends fine acrylic polymers directly into a photo-initiated gel matrix.
When exposed to a UV/LED curing lamp, the photo-initiators link these two chemical networks together, forming a dense web. This structure is significantly lighter and more flexible than traditional acrylics, yet far more durable than standard gel polish. Because of this unique hybrid design, polygel is only partially soluble in chemical solvents. It requires a strategic combination of physical filing to thin the bulk of the product, followed by a targeted chemical soak to safely break down the remaining base layer.
2. The Golden Rule of Polygel Removal: Mechanical vs. Chemical Action
Because polygel is a dense, highly cross-linked hybrid material, you cannot simply drop your fingers straight into a bowl of acetone and expect the product to dissolve quickly like standard gel polish. Attempting to do so will waste hours of your time, dry out your skin, and cause unnecessary chemical irritation to your cuticles.
The absolute safest and most efficient professional removal strategy relies on a two-phase process:
$$\text{Total Safe Removal} = \text{Phase 1: Mechanical Thinning (Filing)} + \text{Phase 2: Chemical Degradation (Soaking)}$$
                   [ THE TWO-PHASE REMOVAL ENGINE ]
                                  │
    +─────────────────────────────┴─────────────────────────────+
    │                                                           │
    ▼                                                           ▼
[ PHASE 1: MECHANICAL THINNING ]             [ PHASE 2: CHEMICAL DEGRADATION ]
- Uses a coarse 100/180 grit file or E-file. - Uses 100% pure acetone solvent.
- Removes 80% of the thick polygel bulk.     - Breaks the thin base layer bonds.
- Stops safely just above the natural nail.  - Lifts remaining product without scraping.
- Phase 1: Mechanical Thinning (80% of the Work): You must first use physical tools—such as a coarse hand file or an electronic file—to grind down the thick bulk, structural apex, and extended length of the polygel enhancement. This physical reduction breaks the protective topcoat and exposes the interior structure of the hybrid material, making it vulnerable to chemical solvents. You must stop this thinning process just a millimeter above the natural nail plate to avoid damaging your natural tissue.
- Phase 2: Chemical Degradation (20% of the Work): Once the product has been thinned down to a paper-thin base layer, you introduce a chemical solvent (100% pure acetone). The acetone easily penetrates the remaining material, softening the final polygel layer and breaking its bond with the natural nail keratin. This allows the remaining product to lift away cleanly without requiring any aggressive scraping or prying.
3. Step-by-Step Methods to Safely Remove Polygel Nails at Home
To help you achieve a clean, damage-free removal, here are the three best methods for breaking down polygel at home, categorized by the tools you have available in your vanity.
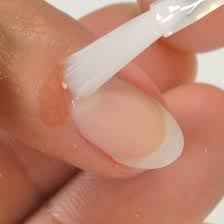
Method 1: The Standard Acetone Foil-Wrap Sequence (The Pure DIY Approach)
This is the most popular, reliable, and accessible method for home use. It relies on standard hand files and a classic foil-wrapping technique to safely dissolve the product.
+-----------------------------------------------------------------+
|               METHOD 1: THE ACETONE FOIL-WRAP SEQUENCE          |
+-----------------------------------------------------------------+
| TOOLKIT:                                                        |
| - 100/180 Grit Coarse Hand File, 240 Grit Fine Buffer           |
| - 100% Pure Professional Acetone (Do not use cosmetic polish remover)|
| - Cosmetic Cotton Balls or Pre-Cut Pads                         |
| - Heavy-Duty Aluminum Foil Cut Into 4x4 Inch Squares            |
| - Pure Cuticle Oil or Pure Petroleum Jelly                      |
| - Professional Wooden Orange Stick or Rounded Cuticle Pusher    |
+-----------------------------------------------------------------+
Detailed Phase-by-Phase Instructions:
Phase A: Mechanical Length and Bulk Reduction
- Trim the Extensions: Use a heavy-duty nail clipper to cut away any extended polygel length that reaches past your natural fingertips. If the polygel extension is very thick, trim it in small, incremental steps from the outer corners inward to prevent the product from cracking down the center.
- File Down the Structural Apex: Take the coarse side of your 100/180 grit hand file and begin filing across the top surface of the polygel nail. Focus your efforts on the center of the nail plate where the “apex” (the thickest part of the extension) sits. Move the file in long, smooth, one-directional strokes rather than a rapid sawing motion to minimize heat buildup.
- Expose the Interior Strata: Continue filing until you have reduced the polygel bulk by roughly 80%. Stop filing immediately when you can see a very thin, translucent layer of product remaining on your nail bed. You should still see the outline of your natural nail texture underneath, but your file should never make direct contact with your natural nail plate.
Phase B: Dermal Protection and Chemical Wrapping
- Shield Your Skin: Because pure acetone is a powerful dehydrator that strips moisture from human skin, you must protect your fingers. Apply a generous layer of cuticle oil or pure petroleum jelly to the skin surrounding your nail beds, your cuticles, and your fingertips. Crucial Note: Keep the oil strictly on your skin; do not get it on the polygel surface, as an oily barrier will block the acetone from breaking down the product.
- Saturate the Cotton Core: Take a piece of cosmetic cotton ball or pad that is sized to match your nail bed. Saturate it completely with 100% pure acetone until it is dripping wet.
- Execute the Foil Lock: Place the wet cotton directly onto the thinned polygel nail. Wrap a pre-cut square of aluminum foil tightly around your entire fingertip, crimping the top and sides securely to seal the cotton in place. The foil serves an important chemical purpose: it prevents the acetone from evaporating into the air and traps your natural body heat, which speeds up the chemical breakdown of the product.
- The Incubation Period: Let your fingers sit completely undisturbed in the wraps for 15 to 20 minutes.
Phase C: Safe Scraping and Final Buffing
- The Twist and Pull Removal: After the incubation period, gently press down on a foil wrap, twist it side to side, and pull it off your finger. The remaining polygel should look soft, blistered, and gooey.
- Gently Lift the Product: Take a wooden orange stick or a rounded metal cuticle pusher, hold it flat at a 30-degree angle against your nail bed, and gently push the softened polygel off your nail from the cuticle toward the free edge. The product should lift away easily with minimal pressure. If you encounter resistance or find spots that are still hard, stop immediately. Re-wet the cotton with acetone, re-wrap that finger, and let it soak for an additional 7 to 10 minutes. Never force or scrape hard product off your nails.
- The Final Wash and Buff: Once all the product is removed, take a fine 240-grit buffer block and gently glide it over your natural nail plate to smooth out any tiny remnants of base gel. Wash your hands thoroughly with warm water and moisturizing soap to remove all chemical residues.
Method 2: The Electric File (E-File) Speed Thinning Method (For Advanced DIYers)
If you own a professional electronic nail file (E-file), you can significantly speed up the removal process. This method cuts out most of the manual filing work, but it requires a steady hand and proper speed control to ensure total safety.
+-----------------------------------------------------------------+
|            METHOD 2: THE E-FILE SPEED THINNING METHOD           |
+-----------------------------------------------------------------+
| 1. CONFIGURATION: Insert a medium-grit ceramic safety bit.      |
| 2. VELOCITY: Set the rotation speed between 12,000 & 15,000 RPM.|
| 3. MOTION: Keep the bit moving in light, continuous strokes.     |
| 4. SAFE STOP: Cease immediately when the thin base coat appears.|
| 5. ACETONE LOCK: Soak the final paper-thin layer for 5 minutes. |
+-----------------------------------------------------------------+
Detailed Technical Instructions:
- Select the Right Drill Bit: Insert a medium-grit ceramic or carbide barrel safety bit into your E-file handpiece. Ceramic bits are excellent for home use because they generate significantly less friction heat than traditional metal bits, keeping your nail beds comfortable.
- Calibrate the Rotation Speed: Set your E-file’s speed dial between 12,000 and 15,000 RPM. If you run the motor too slowly, the bit will catch and skip across the hard polygel surface; running it too quickly increases the risk of accidental slipping. Ensure the rotation direction matches your hand preference (Forward for right-handed users, Reverse for left-handed users).
- Maintain Continuous Motion: Rest your forearm firmly on your table to stabilize your hand, and use your pinky finger as a fulcrum anchor against your hand. Bring the spinning bit down onto the polygel surface using very light, floating pressure. Guide the bit in continuous, one-directional strokes from the cuticle area down toward the free edge. Crucial Rule: Never hold the drill bit in one spot for more than a single second. Keeping an E-file stationary will create an immediate friction “heat spike” that can burn the underlying nail bed.
- Identify the Base Layer Boundary: Watch the dust as you work. Polygel falls away in thick, heavy white shavings. As you thin the product and approach your natural nail plate, you will see a subtle shift in texture—the remaining product will look like a smooth, clear base coat, and you will clearly see the pink hue of your natural nail underneath. Stop drilling immediately at this boundary.
- The Quick Acetone Finish: Soak a cotton pad in pure acetone and apply it to the thin remaining layer for just 5 minutes using a foil wrap or a plastic nail clip. This short soak will dissolve the final film of product completely, leaving your natural nail plates completely untouched by the drill bit.
Method 3: The Acetone-Free Warm Oil and Soap Soak (The Non-Chemical Alternative)
If you have sensitive skin, allergies to acetone, or simply want an entirely non-chemical option, you can remove your polygel enhancement using a warm soak made of water, oil, and soap.
Important Disclaimer: This method is highly effective for sets that have been worn for 3+ weeks and are already showing signs of natural lifting at the edges. It will not easily dissolve a freshly applied, tightly bonded set of polygel.
+-----------------------------------------------------------------+
|            METHOD 3: THE ACETONE-FREE SOAP & OIL SOAK           |
+-----------------------------------------------------------------+
| STEP 1: Fill a large glass bowl with comfortably hot water.    |
| STEP 2: Mix in 2 tablespoons dish soap & 2 tablespoons olive oil.|
| STEP 3: Use a hand file to thin down the topcoat and apex bulk. |
| STEP 4: Submerge your fingertips completely in the warm bath.   |
| STEP 5: Soak for 25 minutes, letting the oils seep beneath gaps.|
| STEP 6: Use an orange stick to lift loosened edges gently.      |
+-----------------------------------------------------------------+
Detailed Action Steps:
- Thin the Topcoat Bulk: Even with an alternative soak, you must break the water-resistant topcoat. Use a hand file to thin down the polygel bulk by at least 50% so the warm liquid can penetrate the material.
- Mix the Deep Soaking Bath: Fill a large glass bowl with comfortably hot water (aim for the temperature of a warm bath). Add 2 tablespoons of grease-cutting liquid dish soap and 2 tablespoons of pure olive oil, jojoba oil, or mineral oil. Stir the mixture thoroughly until a rich, foamy bath forms.
- Submerge and Incubate: Submerge your fingertips completely into the warm bath, ensuring your nail beds are fully covered. Let your hands soak undisturbed for 25 to 30 minutes. If the water cools down significantly during this time, add a splash of hot water to keep the temperature up.
- The Mechanism of Penetration: As you soak, the hot water swells your natural nail plate slightly, while the dish soap breaks down structural oils and the olive oil seeps into the tiny lifting gaps around the edges of the polygel. This action naturally loosens the adhesive bond holding the product to your keratin layers.
- Gently Lift Away: After 30 minutes, remove your hands from the bath. Take a wooden orange stick and carefully slide it into the lifted gaps at the outer corners of the nail. Gently nudge the product upward. If the polygel is loose, it will detach from your nail bed cleanly. If it holds firm, do not force it—soak your hands for an additional 10 minutes to let the oils do their work.
4. The Critical Post-Removal Recovery Protocol: Re-Building Natural Keratin
Once you successfully clear all synthetic polygel from your hands, your natural nail plates will be in a vulnerable, highly porous state. Because your nails have been covered by a non-porous polymer barrier for weeks, their internal moisture and oil balances will be depleted.
To prevent your bare nails from peeling, breaking, or splitting over the coming days, you must follow an intensive Natural Keratin Recovery Protocol.
                      [ THE NATURALLY RADIANT NAIL RECOVERY ]
                                         │
              +──────────────────────────┴──────────────────────────+
              │                                                     │
              ▼                                                     ▼
     [ JOJOBA CORE LIPIDS ]                              [ THE NATURAL KERATIN SHIELD ]
    - Tiny molecular structure.                         - Restores natural strength.
    - Deeply hydrates the nail bed.                     - Seals the porous nail plate.
    - Promotes flexible durability.                      - Protects against water damage.
Step 1: The Deep Jojoba Oil Re-Hydration Treatment
Most commercial lotions contain large molecules that simply sit on top of your skin without penetrating your nail plate. To heal your nails from within, you need an oil that can deeply hydrate your tissue: pure jojoba oil. Jojoba oil has a unique molecular structure that matches your body’s natural sebum, allowing it to easily pass through the tight layers of the nail plate.
- The Routine: Apply a drop of pure jojoba oil directly to each nail bed and cuticle three times a day. Massage the oil firmly into your cuticles and matrix (the half-moon growth area at the base of your nail) for 30 seconds per finger. This constant hydration restores flexibility to the dry keratin layers, stopping brittle nails from cracking under daily pressure.
Step 2: Avoid Water Absorption (The 24-Hour Rule)
Your natural nails are highly absorbent, acting like a hard-packed sponge. When exposed to water, your nail plates expand rapidly; as they dry, they shrink back down. This constant expanding and contracting puts immense strain on weak keratin bonds, leading to peeling and splitting layers.
- The Protection: For the first 24 to 48 hours following your polygel removal, keep your water exposure to a minimum. Always wear thick waterproof rubber gloves when washing dishes, cleaning your home, or shampooing your hair to shield your recovering nails from water damage.
Step 3: Apply a Restorative Keratin Fortifier
If your bare nails feel soft, thin, or bendable, apply a targeted keratin nail fortifier or a high-quality nutrient-infused base coat. Look for formulas containing calcium, vitamin E, and hydrolyzed wheat proteins. Apply a thin, even coat to your clean nails, let it dry, and leave it on for a week before removing it with a gentle, acetone-free remover. This clear layer acts as a protective shield, reinforcing your nails and keeping them safe while they recover.
5. Polygel Removal Comparison Matrix
To help you choose the best removal strategy for your home setup, here is a quick reference comparing each method’s speed, safety, and equipment needs:
| Removal Method | Process Duration | Risk of Nail Damage | Required Skill Level | Primary Practical Benefit |
| Acetone Foil Wrap (Method 1) | 35 to 45 Minutes | Extremely Low (Very Safe) | Beginner Friendly | Highly accessible; breaks down product safely using cheap household items. |
| Electric File Thinning (Method 2) | 15 to 20 Minutes | Moderate (If drill slips) | Intermediate / Advanced | Incredibly fast; minimizes manual filing work and shortens chemical exposure. |
| Warm Oil & Soap Soak (Method 3) | 40 to 50 Minutes | Zero Structural Risk | Beginner Friendly | 100% acetone-free; deeply conditions your skin and cuticles as it works. |
| Aggressive Peeling / Prying | 5 Minutes | Guaranteed Severe Damage | High Risk (Avoid) | Destructive. Destroys your natural nail plates and splits your keratin layers. |
6. Dangerous Removal Mistakes to Avoid At All Costs
To ensure your home beauty routines keep your hands healthy and beautiful, avoid these three dangerous removal mistakes:
Mistake 1: Using Dental Floss or Card Keys to Pry Up the Product
A very dangerous trend across social media platforms involves sliding a strand of dental floss or a thin plastic card beneath a lifted polygel edge and forcing it forward to pop the nail off. Never attempt this. Polygel adheres to your nail plate through an advanced chemical bond. Forcing the product off manually acts as a physical wedge, tearing away the critical top layers of your natural nail plate. This leaves behind uneven, rough white patches, thins out your nails, and can cause your nail bed to separate painfully from its base—a medical condition known as onycholysis.
+-------------------------------------------------------------+
|               THE DENTAL FLOSS PRYING TRAP                  |
+-------------------------------------------------------------+
|      [Polygel Nail Enhancement]                             |
|            │                                                |
|            ▼  <-- Floss forced forward acts as a wedge       |
|      =================== [Dental Floss Tool]                |
|            ▼                                                |
|     [Natural Keratin Layer]  <-- Shredded and torn away     |
|                                                              |
|  [Result: Deep Red Thinning, Chronic Splitting, and Pain]   |
+-------------------------------------------------------------+
Mistake 2: Soaking in Non-Pure Cosmetic Nail Polish Removers
Many beginners attempt to execute the foil-wrap sequence using standard, grocery-store cosmetic nail polish removers labeled as “gentle” or “moisturizing.” These cosmetic removers are heavily diluted with water, alcohol, and fragrances, and usually contain only a tiny percentage of acetone.
Because they lack chemical strength, they cannot dissolve or soften hard polygel. Trying to use them will leave you with hard, unyielding extensions, which often leads to frustration and aggressive scraping. Always check your label and use 100% Pure Professional Acetone for your removal wraps.
Mistake 3: Aggressive Scraper Scraping Near the Matrix Zone
When pushing away softened polygel code with your metal cuticle tool, keep your movements gentle and clear of the matrix zone (the sensitive area beneath your skin just behind your cuticles where new nail cells are created).
Pressing down heavily on this area with a metal tool can permanently bruise or damage your nail matrix. This structural damage can cause your natural nail to grow out with permanent ridges, bumps, or deep splits for the rest of your life. Always hold your tools flat and smooth against the nail plate, and let the chemical soak do the heavy lifting.
7. The Ultimate Nail Health Maintenance Schedule
To maintain beautiful hands and strong, healthy nails between manicure sets, integrate this professional maintenance schedule into your self-care routine:
Daily Ritual: The Matrix Hydration Shock
Keep a small bottle of pure jojoba oil right on your nightstand or workspace desk. Every morning and evening, apply a tiny drop to the base of each bare nail bed and massage it into your cuticles for 15 seconds. Keeping your cuticles hydrated ensures that your underlying matrix receives a steady flow of nutrients, helping your natural nails grow out faster, stronger, and more flexible.
Weekly Routine: The Gentle Length Filing
Instead of using metal nail clippers that snap dry nails violently and cause microscopic fractures along the tip, shape your natural nails using a fine 240-grit wooden emery board or a high-quality glass nail file. File exclusively in one direction—from the outer corner toward the center of the free edge. This smooth motion seals the edge of the keratin layers, preventing water from seeping into the tip and causing your nails to peel or split.
Between Sets: The Strategic Nail Sabbatical
If you love wearing long extensions year-round, give your natural hands a structural break every 3 to 4 consecutive manicures. Let your bare nails rest for a 7-day sabbatical period between sets. Use this resting week to apply nutrient-rich base coats, perform deep oil treatments, and allow your natural nail plates to air out and regain their strength before applying your next set of polygel dual forms.
Summary of the Home Polygel Removal Routine
To keep your natural nails beautifully healthy, follow this simple removal and care checklist:
- Step 1: Trim & Thin: Use clippers to remove the extended length, then use a 100/180 grit hand file or an E-file to grind away 80% of the thick polygel bulk.
- Step 2: Protect the Skin: Apply a layer of cuticle oil or petroleum jelly to the surrounding skin to shield it from drying out.
- Step 3: The Acetone Soak: Place a cotton pad soaked in 100% pure acetone onto the nail, wrap it tightly in aluminum foil, and let it sit for 15 to 20 minutes.
- Step 4: Gentle Push Removal: Remove the foil wraps and use a wooden orange stick to gently push away the softened product without scraping your nail bed.
- Step 5: Hydrate & Recover: Wash your hands thoroughly, smooth out any tiny residues with a soft buffer block, and apply pure jojoba oil to rebuild your nail strength.
By stepping away from aggressive peeling and prying habits and adopting these professional, step-by-step removal methods, you can protect the long-term health of your hands, save money on salon visits, and ensure your natural nails stay strong, radiant, and flawless.